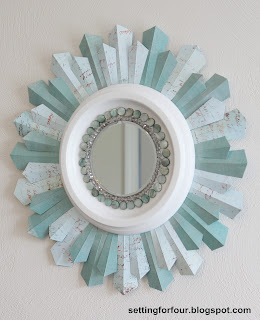
As promised, here's my tutorial on the DIY Sunburst Mirror I made last weekend. If you're interested, try it out this weekend, it doesn't take very long and will save you at least $50 compared to the store bought ones!!
This project cost me only $5.81 (not to be exact or anything...), but I also did use most of what I already had.
What you'll need:
- Circular Mirror (I got this one at Joann's, it was 7")
- Skewers or Dowels (we had BBQ Skewers, but I forgot and grabbed some dowels at Joann's when I got the mirror)
- Hot Glue Gun
- Sharpie
- Spray Paint of your choice (I used left over spray paint from my DIY mercury glass project for our wedding, and had a silver metallic one that I also ended up using)
 |
| Supplies |
Step 1: Start marking off your circle by creating an "x" from the center...although mine is looking a bit off! ha!
Keep dividing 'the pie' until you think you have an idea of how wide you want your 'pattern repeat' to be...aka, eyeball it.
 |
| Nope, still too wide |
Step 4: Repeat by staggering each "round" of sticks gradually until the increments are filled with the "down-up-down" pattern.
Step 5: Cover the mirror with newspaper (actually, I wish I did this before so I could have traced the newspaper with the circle before I placed it on!!)
Step 6: Time to spray paint! Now I wish I could say the ombre look was pre-meditated, but that would be a huge lie. I used the left over mercury glass spray paint because I wanted to have a bit of sparkle...but then, I started to run low. So I grabbed the gray metallic (close enough, right?) and sprayed around at the ends. Well, it was definitely darker but I liked the subtle look. So just like that, BAM! instant "reverse ombre" look!
 |
| Subtle Ombre - What do you think? |
Step 7: Hang and Enjoy! We ended up using a mirror mastic to hang it...because I didn't feel like going back to Walmart to get picture frame hangers! I'd recommend getting those though instead of having to skim coat your walls later on!
Here's some other looks! DIYs for these are everywhere, so pick one you think works best in your home!
HAPPY FRIDAY!!
K


No comments:
Post a Comment